1. Setting Up Your Tiko
Basic Set-Up
Congratulations on your brand new Tiko! Remove the power adapter and TIKO’s armour from the box. Carefully separate. Place TIKO on a stable surface and peel off the protective tape.
Once you get it out of your box, but before you plug it in, please flip your Tiko over and check two things:
- Are the motors firmly connected to the rails?
- Are all wired connections firmly inserted into the board?
If you answered ‘Yes’ to both of those questions, you’re ready to turn your Tiko back over and plug it in! Plug the included power cable into your TIKO and connect to an electric outlet. Once powered, Tiko’s LED lights turn on. Tiko’s alive!
Loading Filament
To get started with printing, you first have to load filament. First, load your WIT (for more information, please see What is the WIT or Manual Controls)
Click 'Manual Controls', and then 'Load Filament'. Once instructed to do so, take your filament and insert it into the filament feeding hole in your filament tray. Push the filament in until you hear a click. At this point, you should notice that the motor is pulling the filament in for you.
Where do I Find Files to Print?
So you've got your Tiko, but you don't know what to print. Well, you have a couple of options!
- Download an .STL file online. There are a number of places you can visit, and the easiest way to get started is simply by searching for .STL files. Once you find something that you want to print, download it and drag and drop the file into our WIT.
- Create your own 3D model. If you have experience with 3D modelling software, or want to learn a new skill, this allows you to create anything you can think of! There are a number of free and paid 3D modelling software options available. Search for 3D modelling software and take a look at all the options available to you.
2. Connecting to Your Tiko
Getting Connected
Connect to Tiko-WiFi-XXXX found in your device’s WiFi Networks. Tiko’s LEDs should be a solid light once connected.
Type print.tiko/ or 192.168.1.1 (recommended) into your Google Chrome browser to continue. This could take up to a minute. To do this, you must be connected to your Tiko.
Connect TIKO to your WiFi and follow on-screen instructions to connect to your home wifi so that you can receive updates to your software and firmware.
Not interested in cloud printing? Once you've successfully connected your Tiko to your home internet, just reconnect to your Tiko-WiFi-XXXX, head to print.tiko/ and click 'Use Offline'.
Connection Issues
Please note that Tiko is only able to connect to 2.4 GHz channels, and does NOT support 5 GHz channels. Tiko uses 192.168.1.1 as a default IP address, however this can be changed by updating to S: 1.2.5 or later, then connecting to your Tiko-Wifi and going to print.tiko/settings
You may need to use the recovery hotspot method below to update your Tiko to 1.2.5 if you are having router IP conflict issues, however once this is done and you update your Tiko's IP address, you won't need to use the recovery hotspot method anymore if your home network is set up on your Tiko.
If you are having issues getting your Tiko updated, please try the following steps.
- Connect to your Tiko
- Open the recovery page (print.tiko/recovery)
- Click Remove Profiles
- Add in your home network credentials, using 0 for priority, WPA1/WPA2 is most common
- Click Add profile
- Unplug your Tiko and plug it back in again, then connect and go to print.tiko/about and send me your software/firmware version codes
If for some reason your Tiko refuses to connect to local WiFi connections using the above method, then you can use your mobile phone to create a mobile hotspot with the following credentials:
SSID: Tiko-Recovery
Pass: RecoverMyTiko
Tiko already has this network hard-wired at max-priority into the firmware. Simply boot your Tiko up with this WiFi network broadcasting on your phone, and Tiko will connect to it and attempt to download an update. Please note that updates are about 3.5mb in size, if data usage is an issue. You do not need to set this network up on your Tiko - it is automatically recognized!
Do I Need an Internet Connection?
In order to update your Tiko or access cloud printing, you must have an internet connection. However, you can print with no internet at all! Tiko will create it's own access point (hot spot) that will allow you to print in offline mode anywhere, so long as you have a device that can connect to the hot spot and a file to print!
Changing WiFi Networks
If you want to change your network profile or connect to a different WiFi network, it's easy to do.
Simply start up your Tiko and click on settings. From there you can manage WiFi connections and credentials.
3. Software
When I Try to Access the WIT, I See “Page Not Found”
If you're getting a "Page not found" error when you visit 192.168.1.1 or print.tiko/ try the following steps.
- Browser Settings
- Open your browser history
- Clear cached images and files
- Visit 192.168.1.1 and see if you are able to access the site
- Formatted SD card
- If you formatted your SD card, open [Recovery.html]
- enter your WiFi credentials – SSID, select security type (most common is WPA1/WPA2), type in your password, and enter 0 for priority
- Click ‘Add Profile’
- Reboot your Tiko and see if the page loads after Tiko finishes updating
If these solutions don't work, contact us for help by submitting a support ticket!
What Settings Can I Change?
We have made our software as minimalistic as possible. There will be four settings which you are able to control: layer height, infill percent, nozzle temperature and support material. You will also be able to adjust the brightness of the LED lights!
If you'd like to change more settings, you have the option of using a 3rd-party slicer to create gcode, which you can drag-and-drop into our WIT to print!
For more information, please see: Manual Controls and Print Settings
Can I Control the LED Lights?
The LED lights allow for complete control during printing. You can dim or brighten them to any level, including turning them fully off. To do so, open your WIT and click 'Manual Controls'. Then simply navigate to the LED Brightness slider, and drag it to the desired level.
For more information, please visit What are the Manual Controls.
What is the WIT?
The WIT, or Web Interface of Tiko, is where you’ll do your printing. The WIT allows you to load an STL file, modify your print settings, load/unload filament, and dim your Tiko’s LED lights. To access the WIT, visit http://print.tiko3d.com. If you are connected to your Tiko’s hotspot, you can also access the WIT by typing 192.168.1.1 or print.tiko.
How to Load an Object
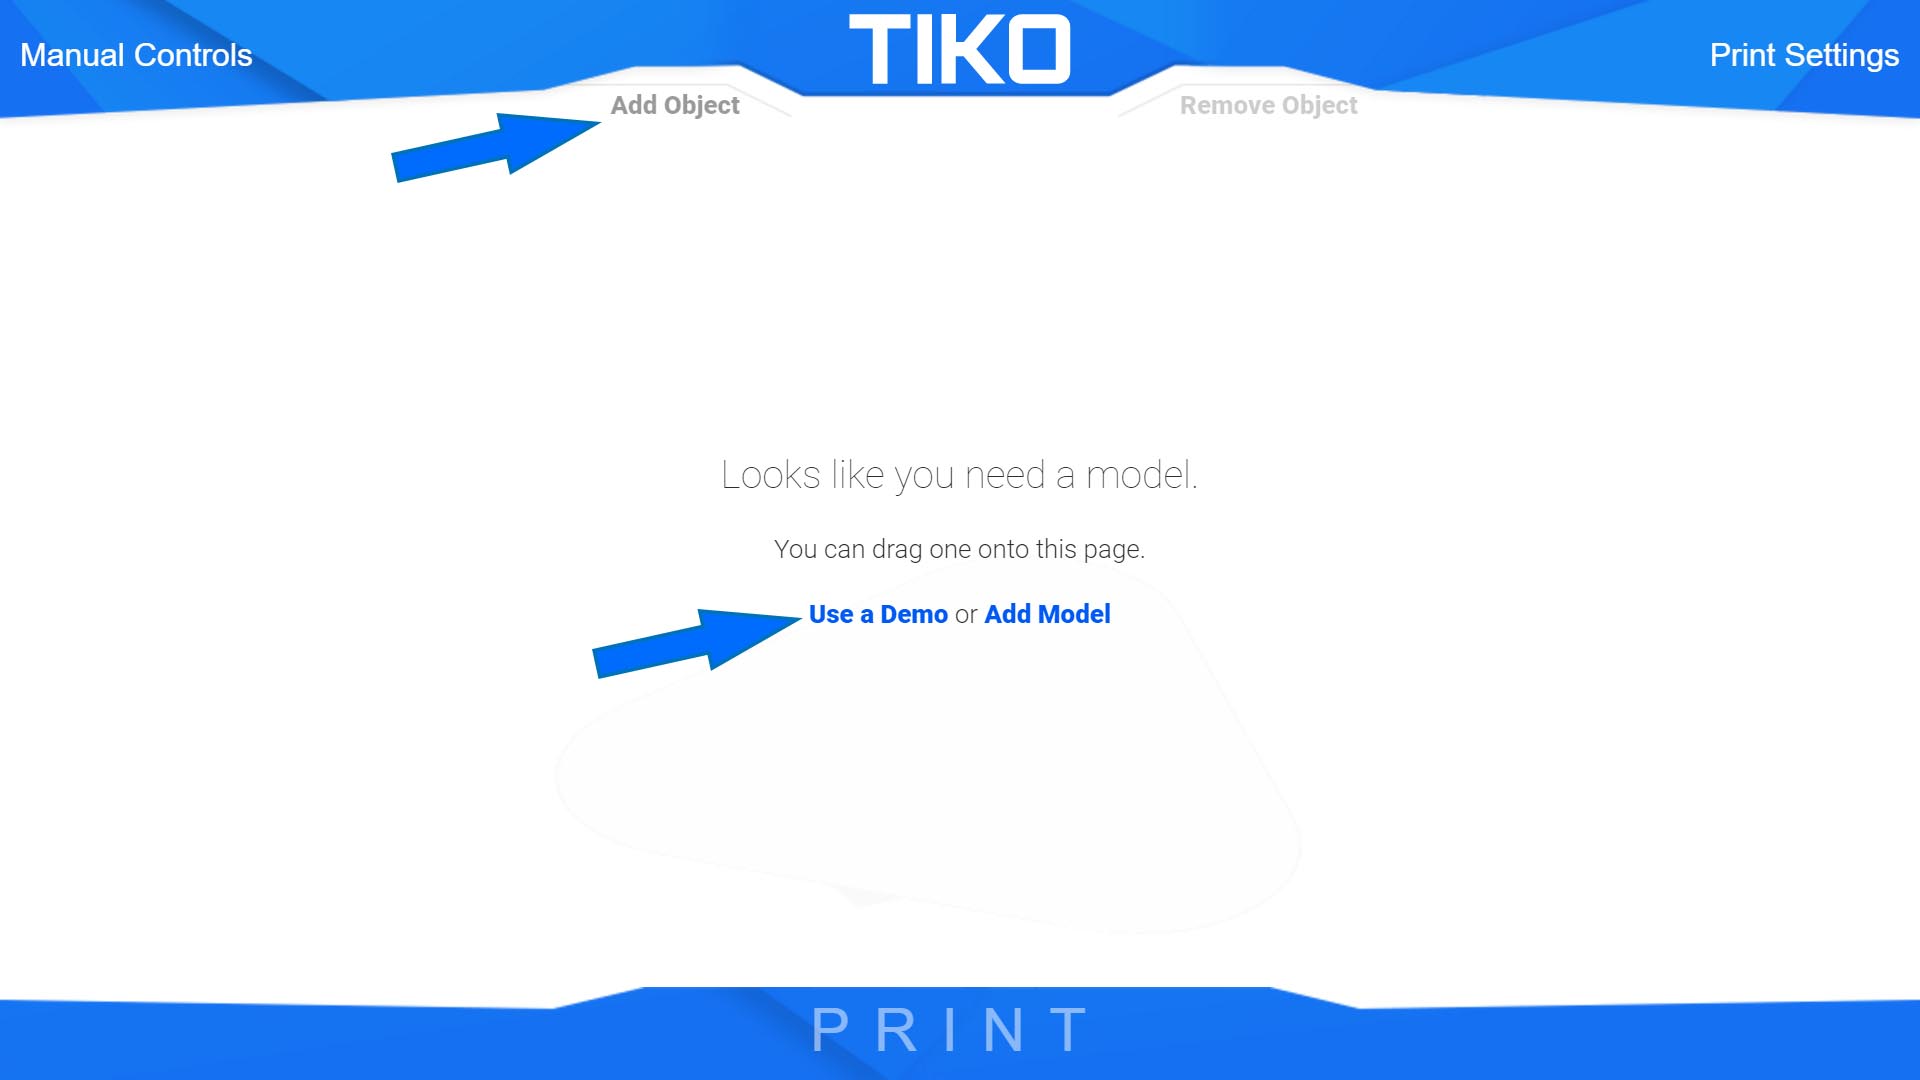
To get printing, you first need to load an object into the WIT. An object is an STL file, which the WIT will slice (convert the file into instructions for your printer) to prepare it for printing. To load an object, you can either click ‘Add Object’ or ‘Add a Model’ or simply drag and drop an STL file into the WIT from your computer.
How do I Remove an Object/File?
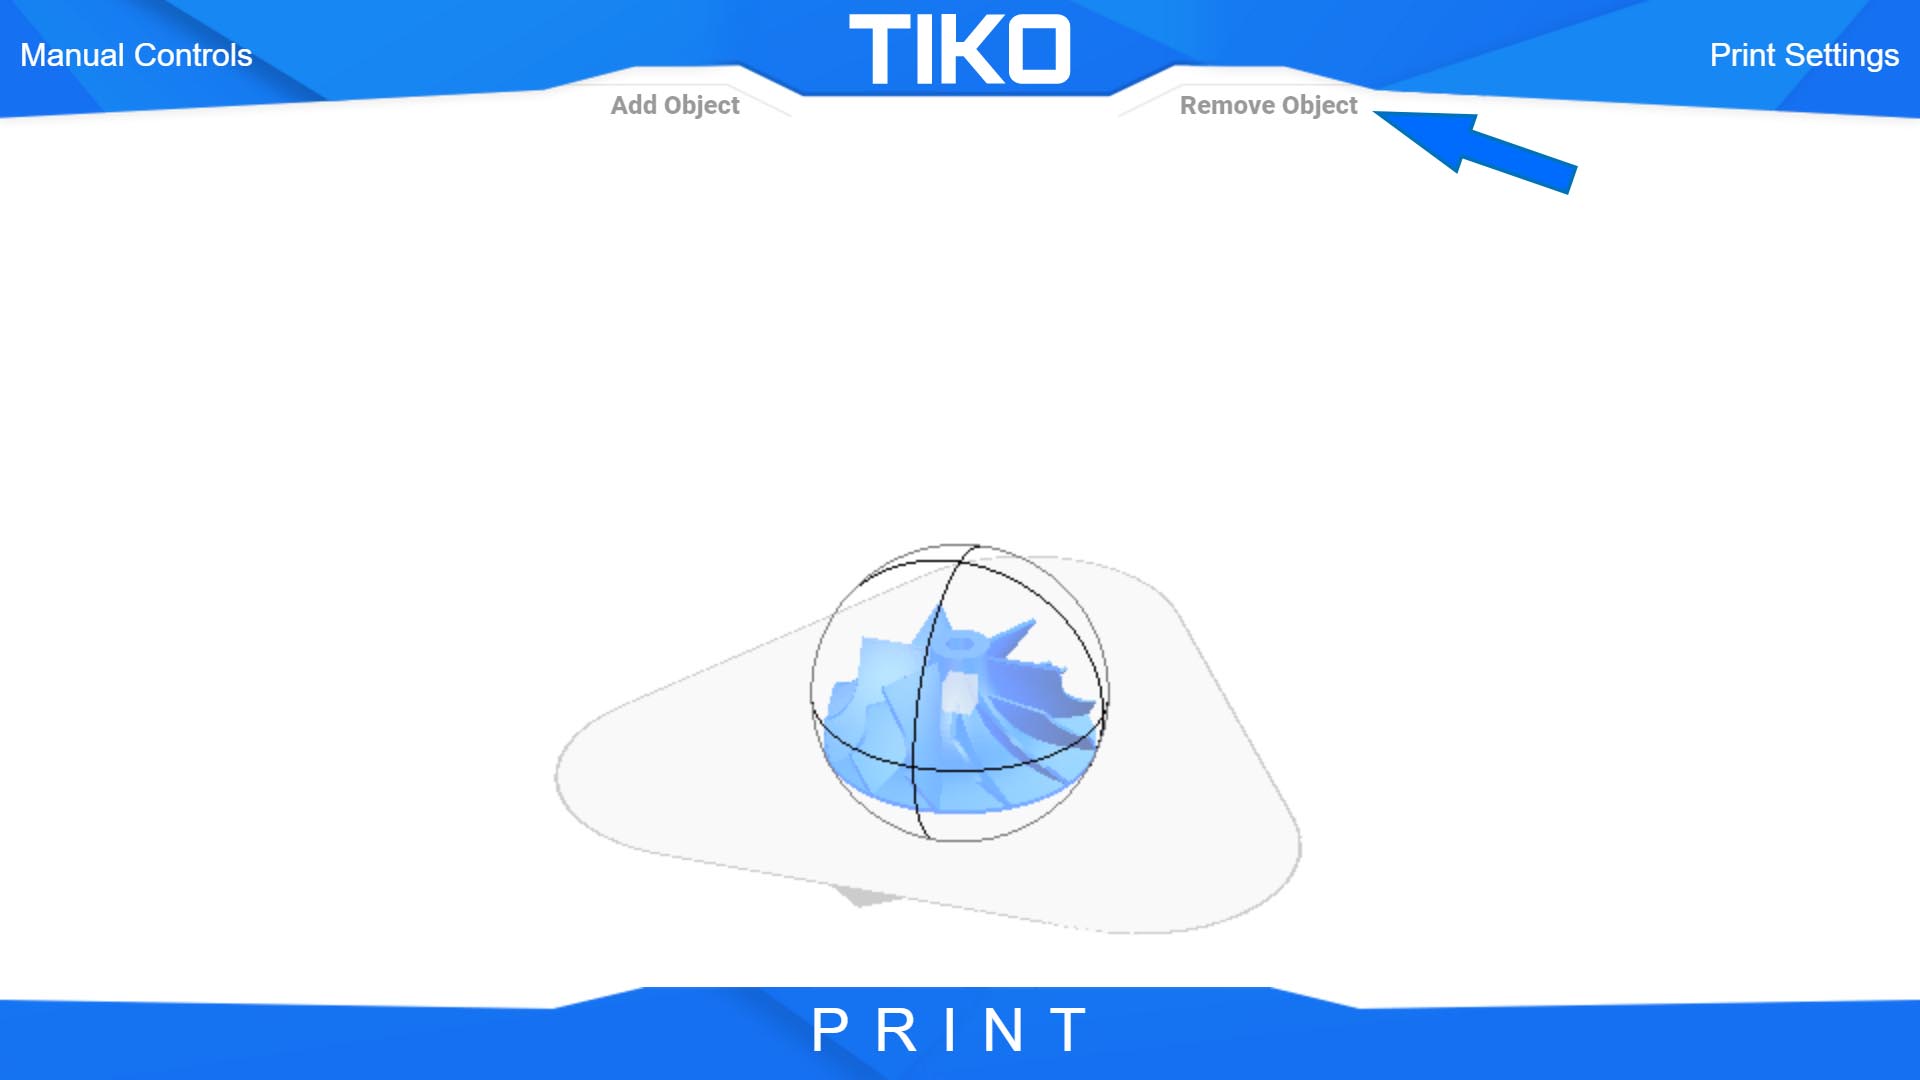
To remove an object STL file once you’ve loaded it, simply click ‘Remove Object’. Alternatively, you can click on your object so that a sphere highlights the object, and then click ‘del’ or ‘backspace’ on your keyboard.
Print Settings Explained
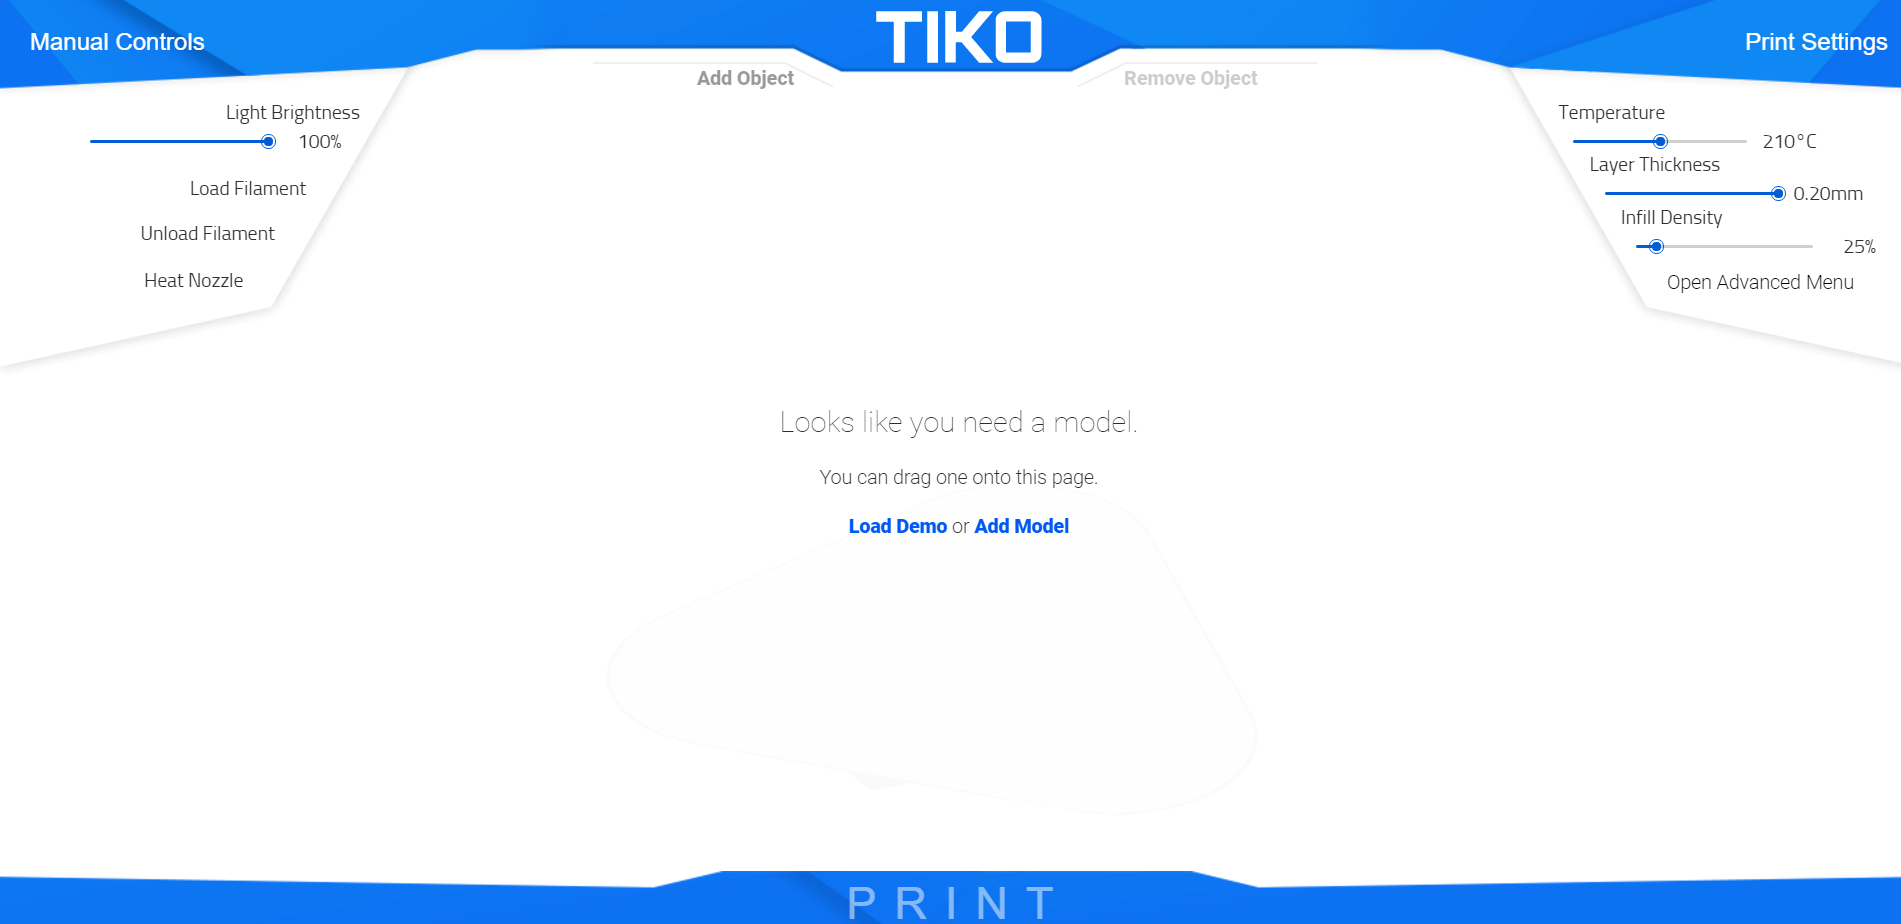
Temperature: The default temperature setting for Tiko3D is currently set to 200°C, and allows for a minimum temperature of 180°C and a maximum temperature of 240°C. PLA typically prints in the range of 180°C to 220°C. You can try different temperatures to see how they affect your print. By trying the same print at different temperatures, you can find an ideal temperature setting for your filament.
Layer Thickness: Layer Thickness refers to the actual thickness of each layer your Tiko will print. The lower the thickness, the better the quality of the print. Smaller layers will mean they are less visible, leading to a smoother looking print. Tiko 3D can print from a minimum layer thickness of 0.05mm (50µm = 50 microns) and a maximum layer thickness of 0.20mm (200µm = 200 microns).
Infill Density: Infill Density refers to the actual amount of filament inside the print. An infill density of 0% would be used for a hollow/vase object, whereas an object that may require strength would be better suited to a higher infill density. The higher the density, the more filament inside the print. Infill serves as support for objects. You can set Infill Density from 0% (hollow) to 100% (completely solid).
Advanced Menu: Advanced print settings recommended for those who are familiar with these settings.
In general, if you notice that your nozzle is a bit too close or too high from the base after auto-calibration, you can adjust AutoLevel Offset to help. Try a value like 0.2mm if your nozzle is a bit too low, and 0.4-0.6mm if it's really digging into your base. If your nozzle is too high, try -0.2 to -0.5mm to lower it.
How do I Use Gcode with Tiko’s WIT?
Just save a gcode file on your computer, and drag and drop it into the WIT. Alternatively, you can click ‘Load Model’ and navigate to the file on your computer. This process allows you to generate external gcode and further modify print settings. We recommend this for advanced or experienced users.
What are the Manual Controls?
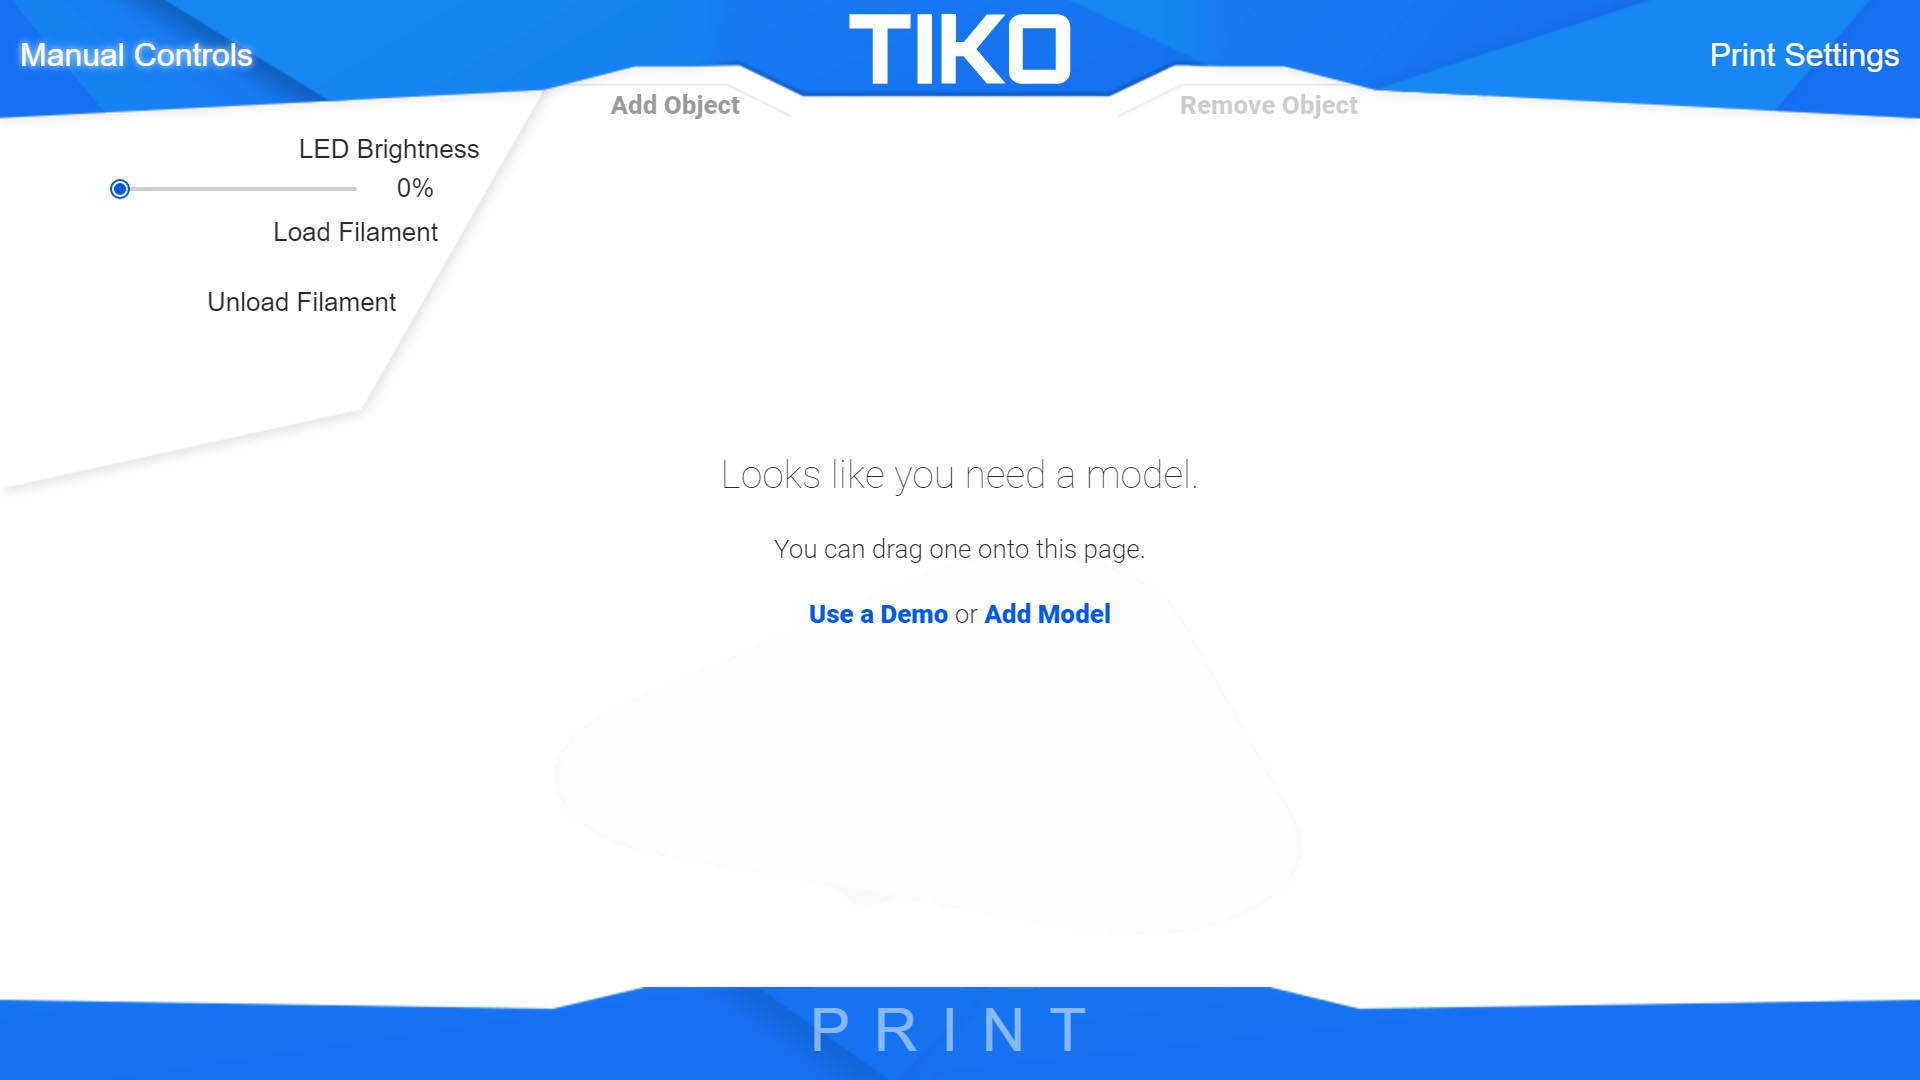
In order to access the manual controls, click ‘Manual Controls’ in the top left corner.
LED Brightness: Allows you to dim or brighten the LED lights inside of your Tiko.
Load Filament: Click ‘Load Filament’ to initiate the loading process. For more information, visit How to Load Filament
Unload Filament: Click ‘Unload Filament’ to start the unloading process.
How do I Change the Size/Orientation of my Object?
Re-Sizing: To change the size of your object, simply hover over or click on your object to make a sphere appear around it. A small white cube appears in the middle of the object. Clicking the cube and dragging down will make your object smaller, while dragging up will increase the size of your object.
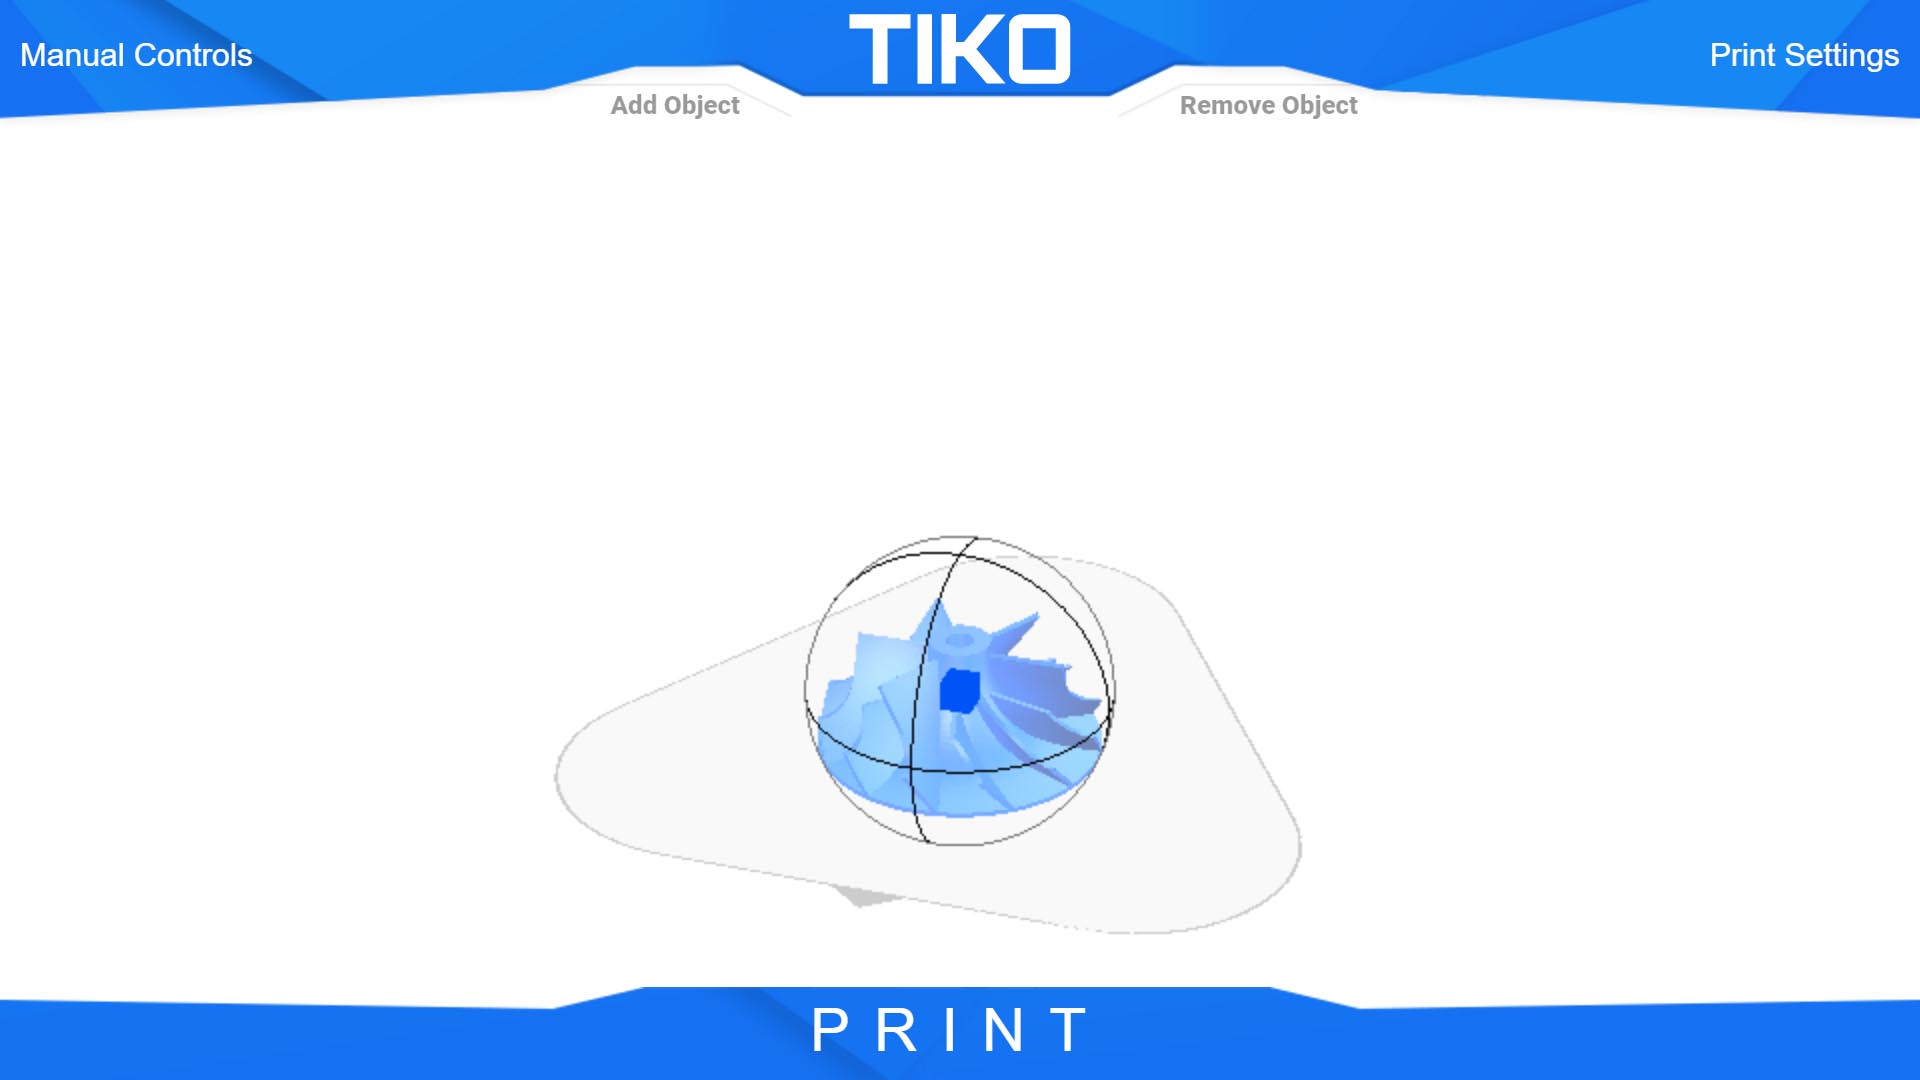
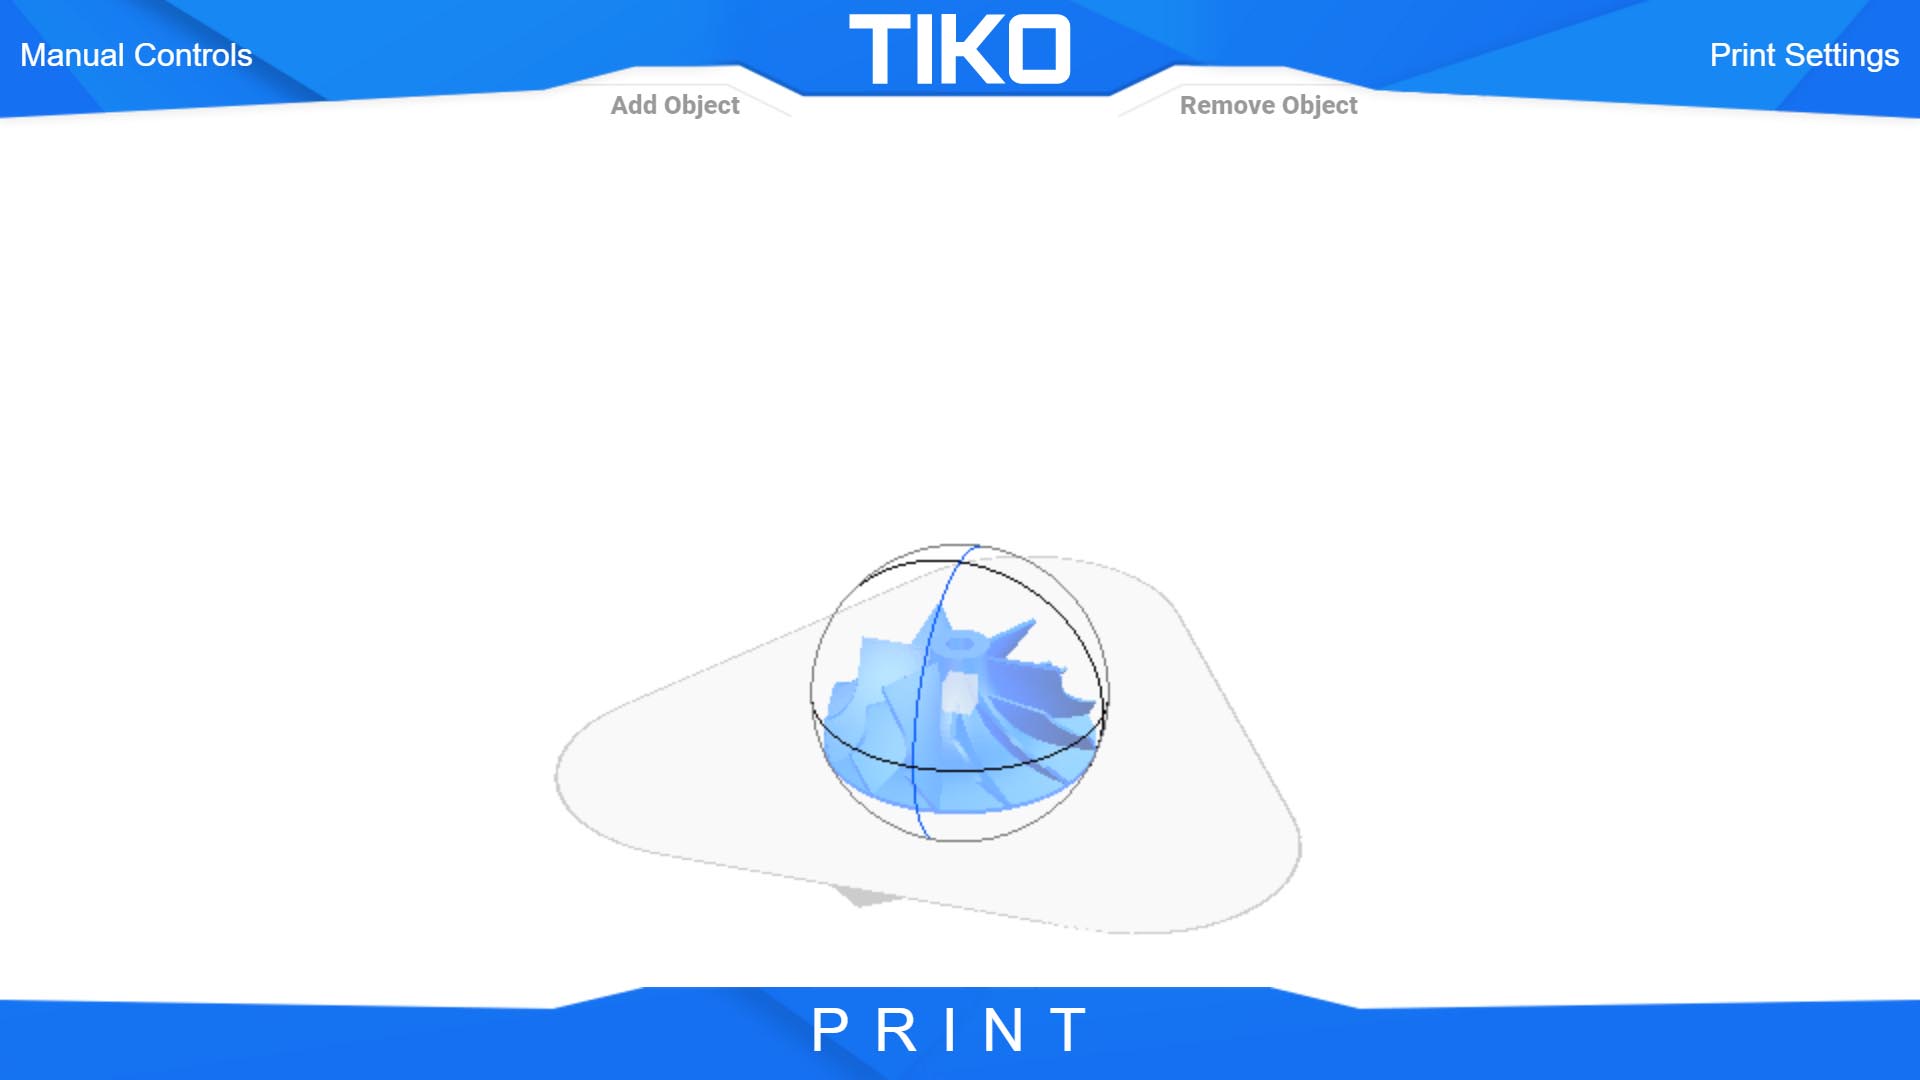
Orientation: To change the orientation of your object, hover over or click your object to make a sphere appear around it. Clicking and dragging one of the lines on the sphere will allow you to rotate your object. The lines which allow this will highlight in blue when you hover over them.
4. Filament
Supported Filament Materials
Tiko can print with PLA, ABS, HIPS, Nylon, and more. Although currently optimized for PLA, we encourage you to try printing with different types of materials! Tiko can extrude, PLA, ABS, HIPS, and nylon, though you may run into issues with warping as Tiko does not have a heated bed, and we cannot guarantee perfect results.
How does the filament feed work?
Tiko has a filament detection system, so loading filament is as simple as pushing the filament into the slot until Tiko detects and ‘grabs’ it, and takes it from there. Removing filament is done via the software via a single button.
How to Load Filament
Please make sure that you do not try to load any filament until instructed to do so by the WIT. Once you are asked to load filament by the WIT, please do so immediately, as waiting too long may cause issues in the feeding process.
If your filament isn’t loading, try pushing a bit harder to get the filament to the filament drive gear – there are a few mm between the filament detection switch and the drive gear, so you may be able to just push it through so that it will be detected. It may require a fair amount of pressure.
Filament is Turning into a Ball at the End of the Nozzle
If you are noticing that the filament is just sticking to the end of the nozzle, and not adhering to the bed, there may be an issue with your calibration/leveling.Try fine-tuning the calibration manually. The print head should be just above the print bed, with just enough space to slide a piece of paper between the nozzle and bed.
The manual calibration process levels the print head at three different points. The head will move to point 1, where you can adjust the nozzle height. Then it will move to points 2 and 3 allowing for the same calibration process.
Perform your calibration, start a print, and watch the print head. If it looks like it is too high or too low in a certain point, stop the print and perform the calibration again. This time, simply lower or raise the head 1-2 clicks at the point where you noticed an issue. Our slicer will save your last manual calibration settings, so when starting a print, one click of the down button will bring the nozzle to where you last had it positioned.
Filament is Stuck to the Print Head
If your filament has stuck to the end of the nozzle, get a pair of needle nose pliers or tweezers and carefully remove the filament while it is still hot. If the nozzle has cooled, plug your Tiko in and connect to the Wifi. Open the WIT (print.tiko/) and run the 'Heat Nozzle' function. Once this process is complete, tip Tiko on it's side, remove the base, and pull off any remaining filament using tweezers or needle nose pliers.
How Should I Store My Filament?
Filament should be stored in a cool, dry environment. You may want to used a sealed plastic bag or container to store your filament. If you do not plan on using your filament for a while, please leave it inside its shrink-wrapped package.
Filament is Jammed in the Extruder
If filament has broken off inside your extruder, use the below guide to disassemble the components and remove the jammed filament.
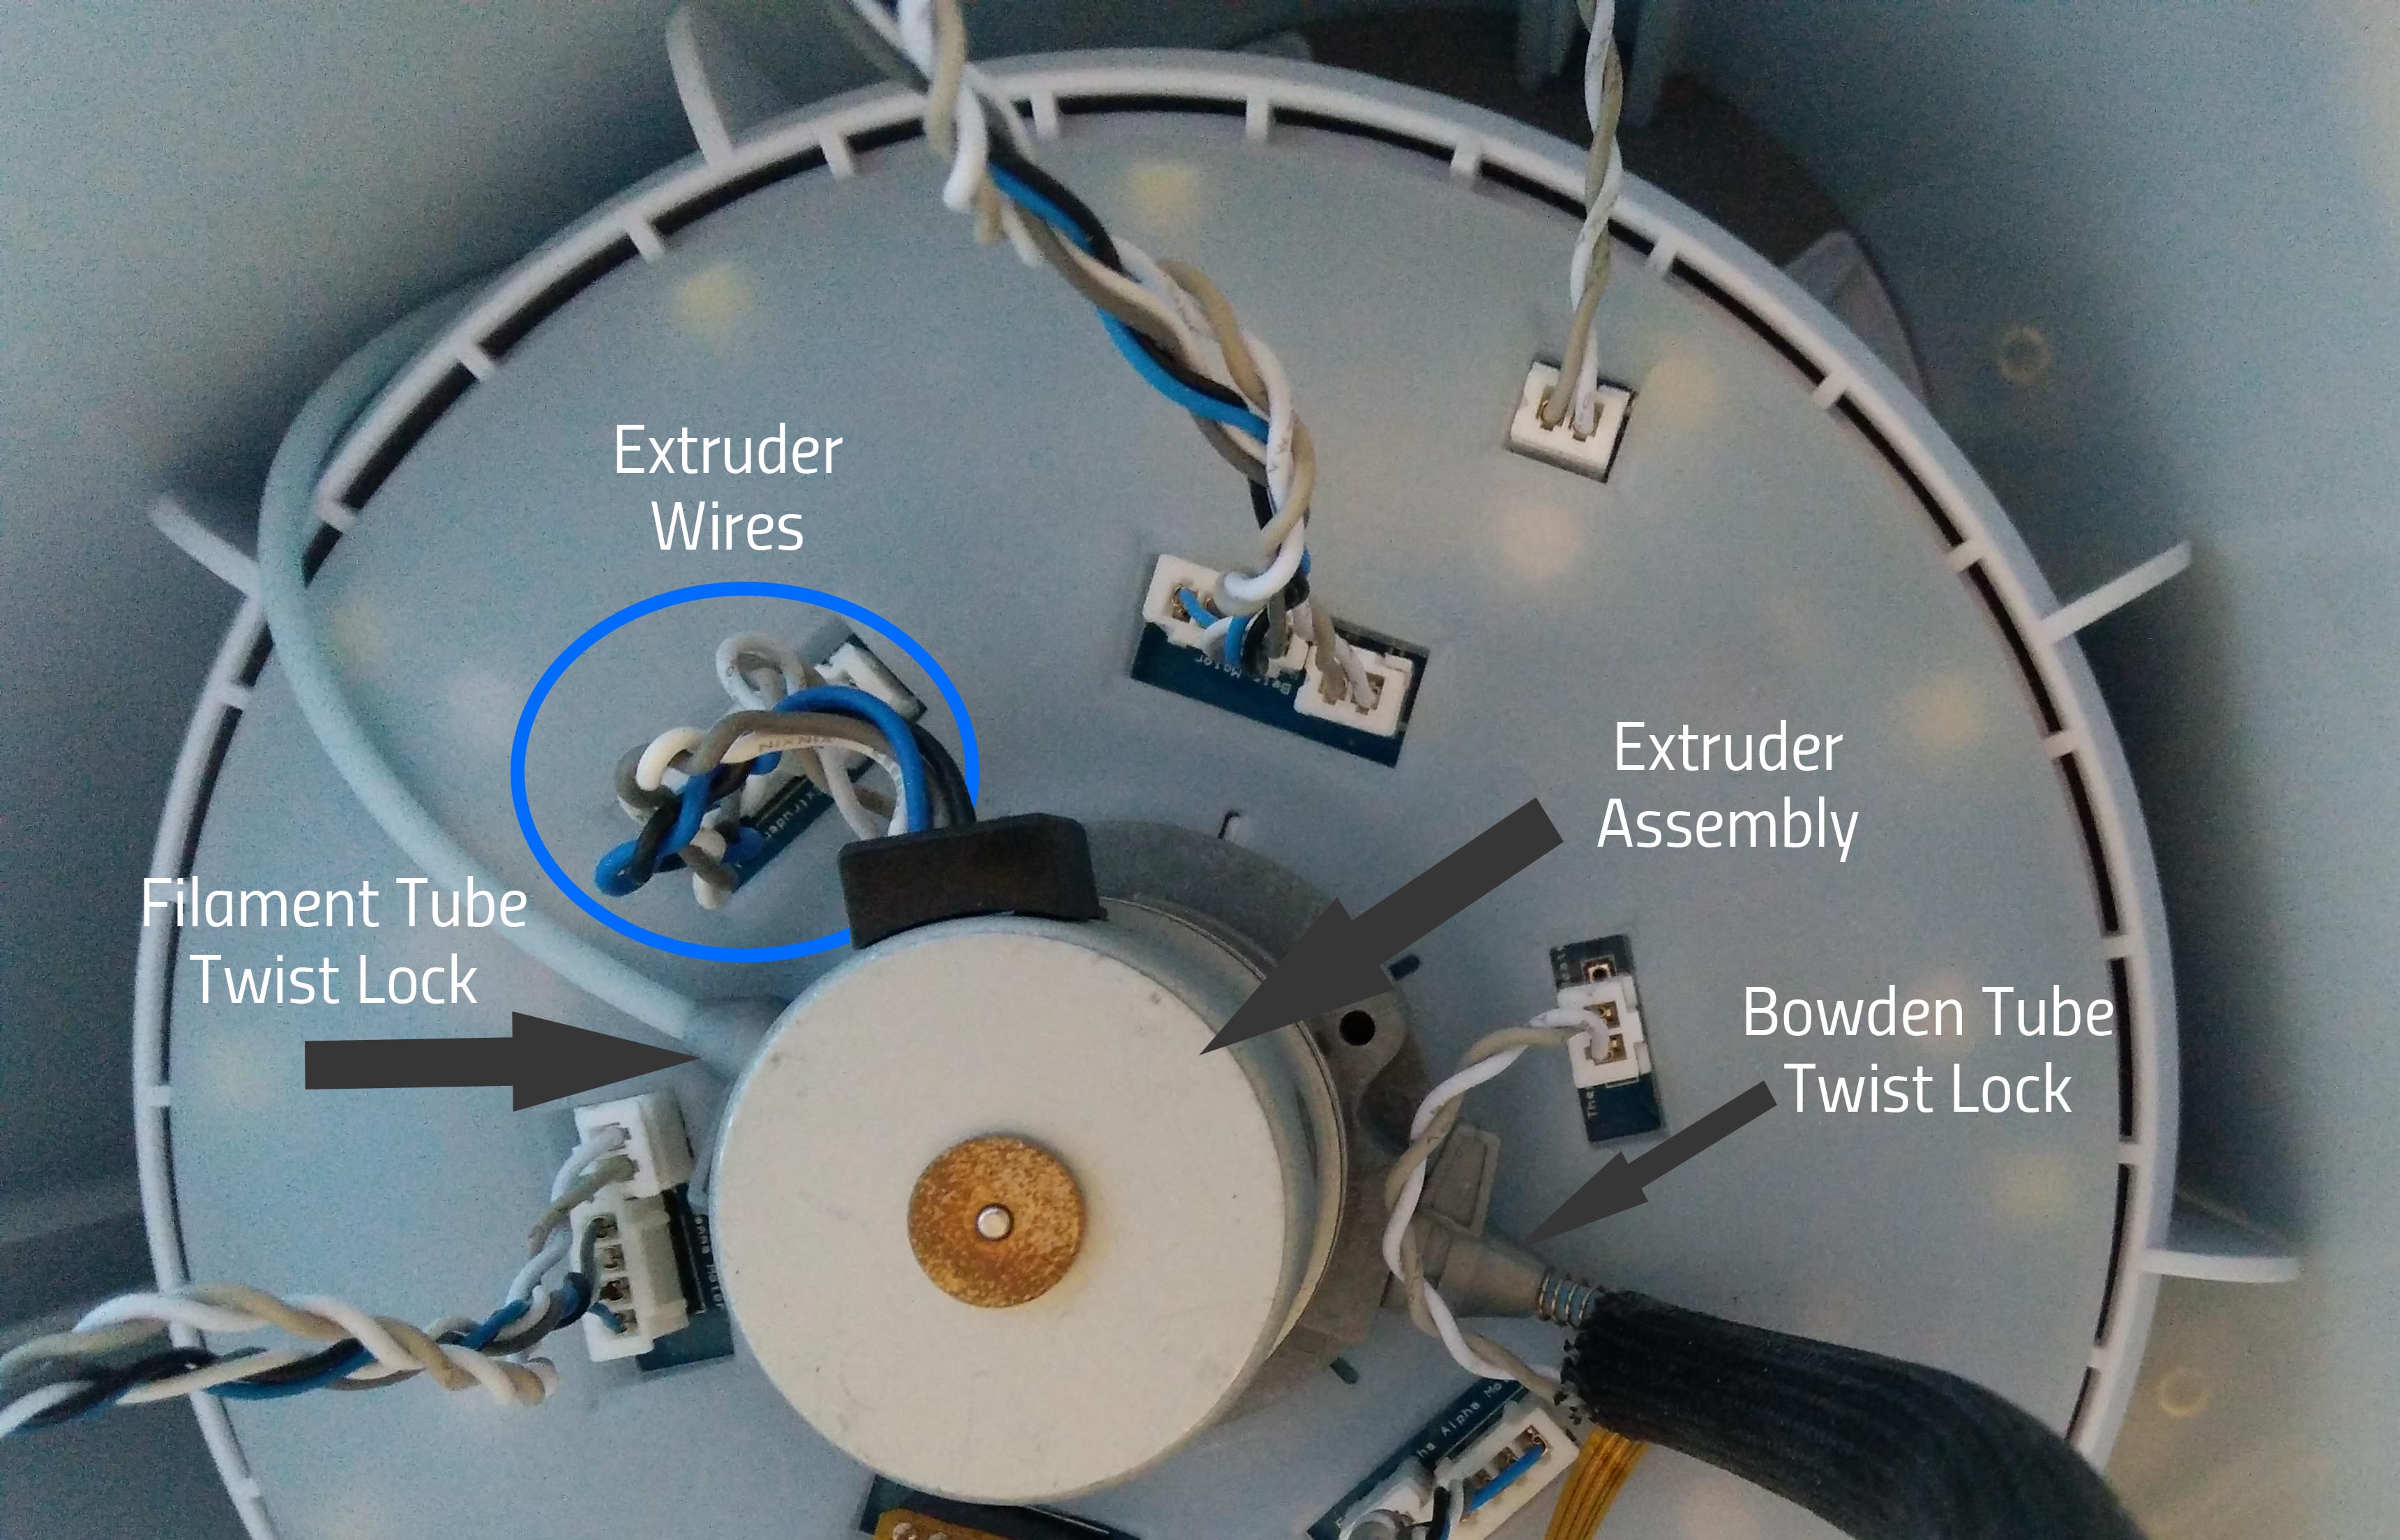
- First, to start, please unplug the wire connections from the extruder motor. There are two, a four-pin and two-pin (in blue).
- Undo the two grey twist-locks by rotating them so that they are pointing straight up.
- Pull the twist locks off. You may need to cut/break off the filament if the spool is still attached
- Push down on the extruder motor and twist counter clockwise (like a pill bottle) to remove it.
- Now that the extruder is removed, please flip it over and unscrew the two screws circled in green.
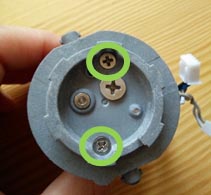
- Place the screws aside, and separate the bottom grey piece
- The filament should now pull out – if you are having trouble, please use pliers to get it out.
- Reverse these steps to put it back together. To pop the extruder motor in, just line up the groove on the bottom of the grey piece with the two tabs in the white board – you can’t do it wrong as it will only attach one way!
- For the four-pin wired connections, please make sure that the side of the connector with metal at the tips is facing toward the outside of the printer, and the sides with the small rails are facing toward the extruder. The two pin connectors have a plastic piece that prevent them from being inserted backward.
Filament is Jammed in the Liquifier
If you think filament may be jammed inside your liquifier, you can take it apart using the below guide.
- Extend the motor arms all the way to the bottom of the rails (they should be above the clear acrylic if the printer is upside down
- Disconnect all electrical components and Bowden tube twist-locks
- Pull the grey connecting arms off the nozzle end (6 in total)
- Cut the filament as close as possible to the extruder motor, so that a piece is visible from the end of the Bowden tube
- Pull the liquifier outside of the Tiko
- Push back the black sleeve and remove the tape holding the wires in place.
- Unscrew the black compression fitting at the nozzle end of the liquifier (you may need pliers if it is on too tight)
- Holding the nozzle in one hand, heat up the tip using the blue flame of lighter or a butane torch (using the blue part of the flame will cause less charring/black discolouration on the tip) for approximately 10-15 seconds to warm the filament for easier removal
- Pull the filament out of the tube from the end where it is sticking out, or between the compression fitting and nozzle if the piece is small.
- If the filament has broken off inside the Bowden tube, you can try using another piece of filament to push the broken piece through the tube
- Pull the jammed filament out of the end of the Bowden tube
- Reassemble

How Much does Filament Cost?
The cost of filament depends on various factors. The price for PLA ranges from $25 - $35 but the material lasts a while. You can buy it online from a variety of retailers. Tiko uses a 1.75mm, 1kg spool.
My Filament isn't Extruding
If you start a print, but notice that filament is not coming out of the nozzle, there are a few potential causes. To start, please make sure you wait 1-2 minutes after starting your print to make sure that filament really isn't extruding. Sometimes it can take a bit for filament that cooled in the tube to liquify and begin extruding.
Once you've done this, please try the following solutions in order.
- Make sure your filament spool is not tangled. Unload your filament, remove your spool from the filament tray, and try unwinding some of the filament. You should be able to easily unwind the filament. If it seems to be stuck, try unwinding the filament until you get past the tangle, then reload and try your print again.
- If this does not work, you may have a jam in your bowden tube. Please visit: Filament is Jammed in the Liquifier.
- If there is no filament in your liquifier, you may have a piece broken off inside your extruder. Please visit: Filament is Jammed in the Extruder.
5. Issues with Printer Parts
Extruder Assembly - Loading/Unloading Problems
To help diagnose an issue with the extruder please use the following guide. Typical symptoms will be problems loading or unloading.
- First, during the loading process, make sure that you have ‘helped’ your filament along. There is a bit of a space between the sensor and the part of the motor that grabs the filament. After you’ve clicked load, and once instructed to do so by the screen, feed the filament into the tube by hand, continuing to press it in until you feel the motor grab it and pull the filament in by itself.
- Next, test the unload and load process. Unload your filament, and then load it, offering some resistance as the motor pulls the filament in. If the motor is able to pull the filament in, even while you offer a bit of resistance, it is unlikely you have an extruder failure.
If your extruder is unable to pull the filament in by itself or with slight resistance, please visit our Replacement Parts page to order a new Extruder Sub-Assembly
If your extruder hasn't failed step 2, please visit our Liquifier Issues article, as it may be a problem with your liquifier sub-assembly.
Motor Carriage - Motor Fell Off the Rail
If any of your stepper motors falls off the rail, don't worry! Just align the silver gear on the back of the motor in the center of the rail, and place the two sets of grey clips on the outside of the rails. Apply a little pressure in the middle of the motor, and it'll just pop on. Alternatively, you may slide it on from the bottom of the rail.
Motor Carriage - My Motors Won't Move
If your motors don't seem to be moving at all, first check to make sure your Tiko has power. When you plug your Tiko in, the lights should come on, and you should hear the motors starting to move.
If that's not the case, unplug your Tiko, flip it over, and pull the motors up and move them around. If they come off the rails during this process, snap them back into place. Sometimes a motor is partially off the rails and by moving them, you are able to set them back in place.
Finally, if these solutions don't work, with the power still off, flip your Tiko over and make sure that the wires running from the motors are firmly plugged into the board!
Inside Your Tiko
Do you wonder what the name of a specific part is? Where things are supposed to connect? Check out this diagram for some help and to familiarize yourself with the inner workings of your Tiko.
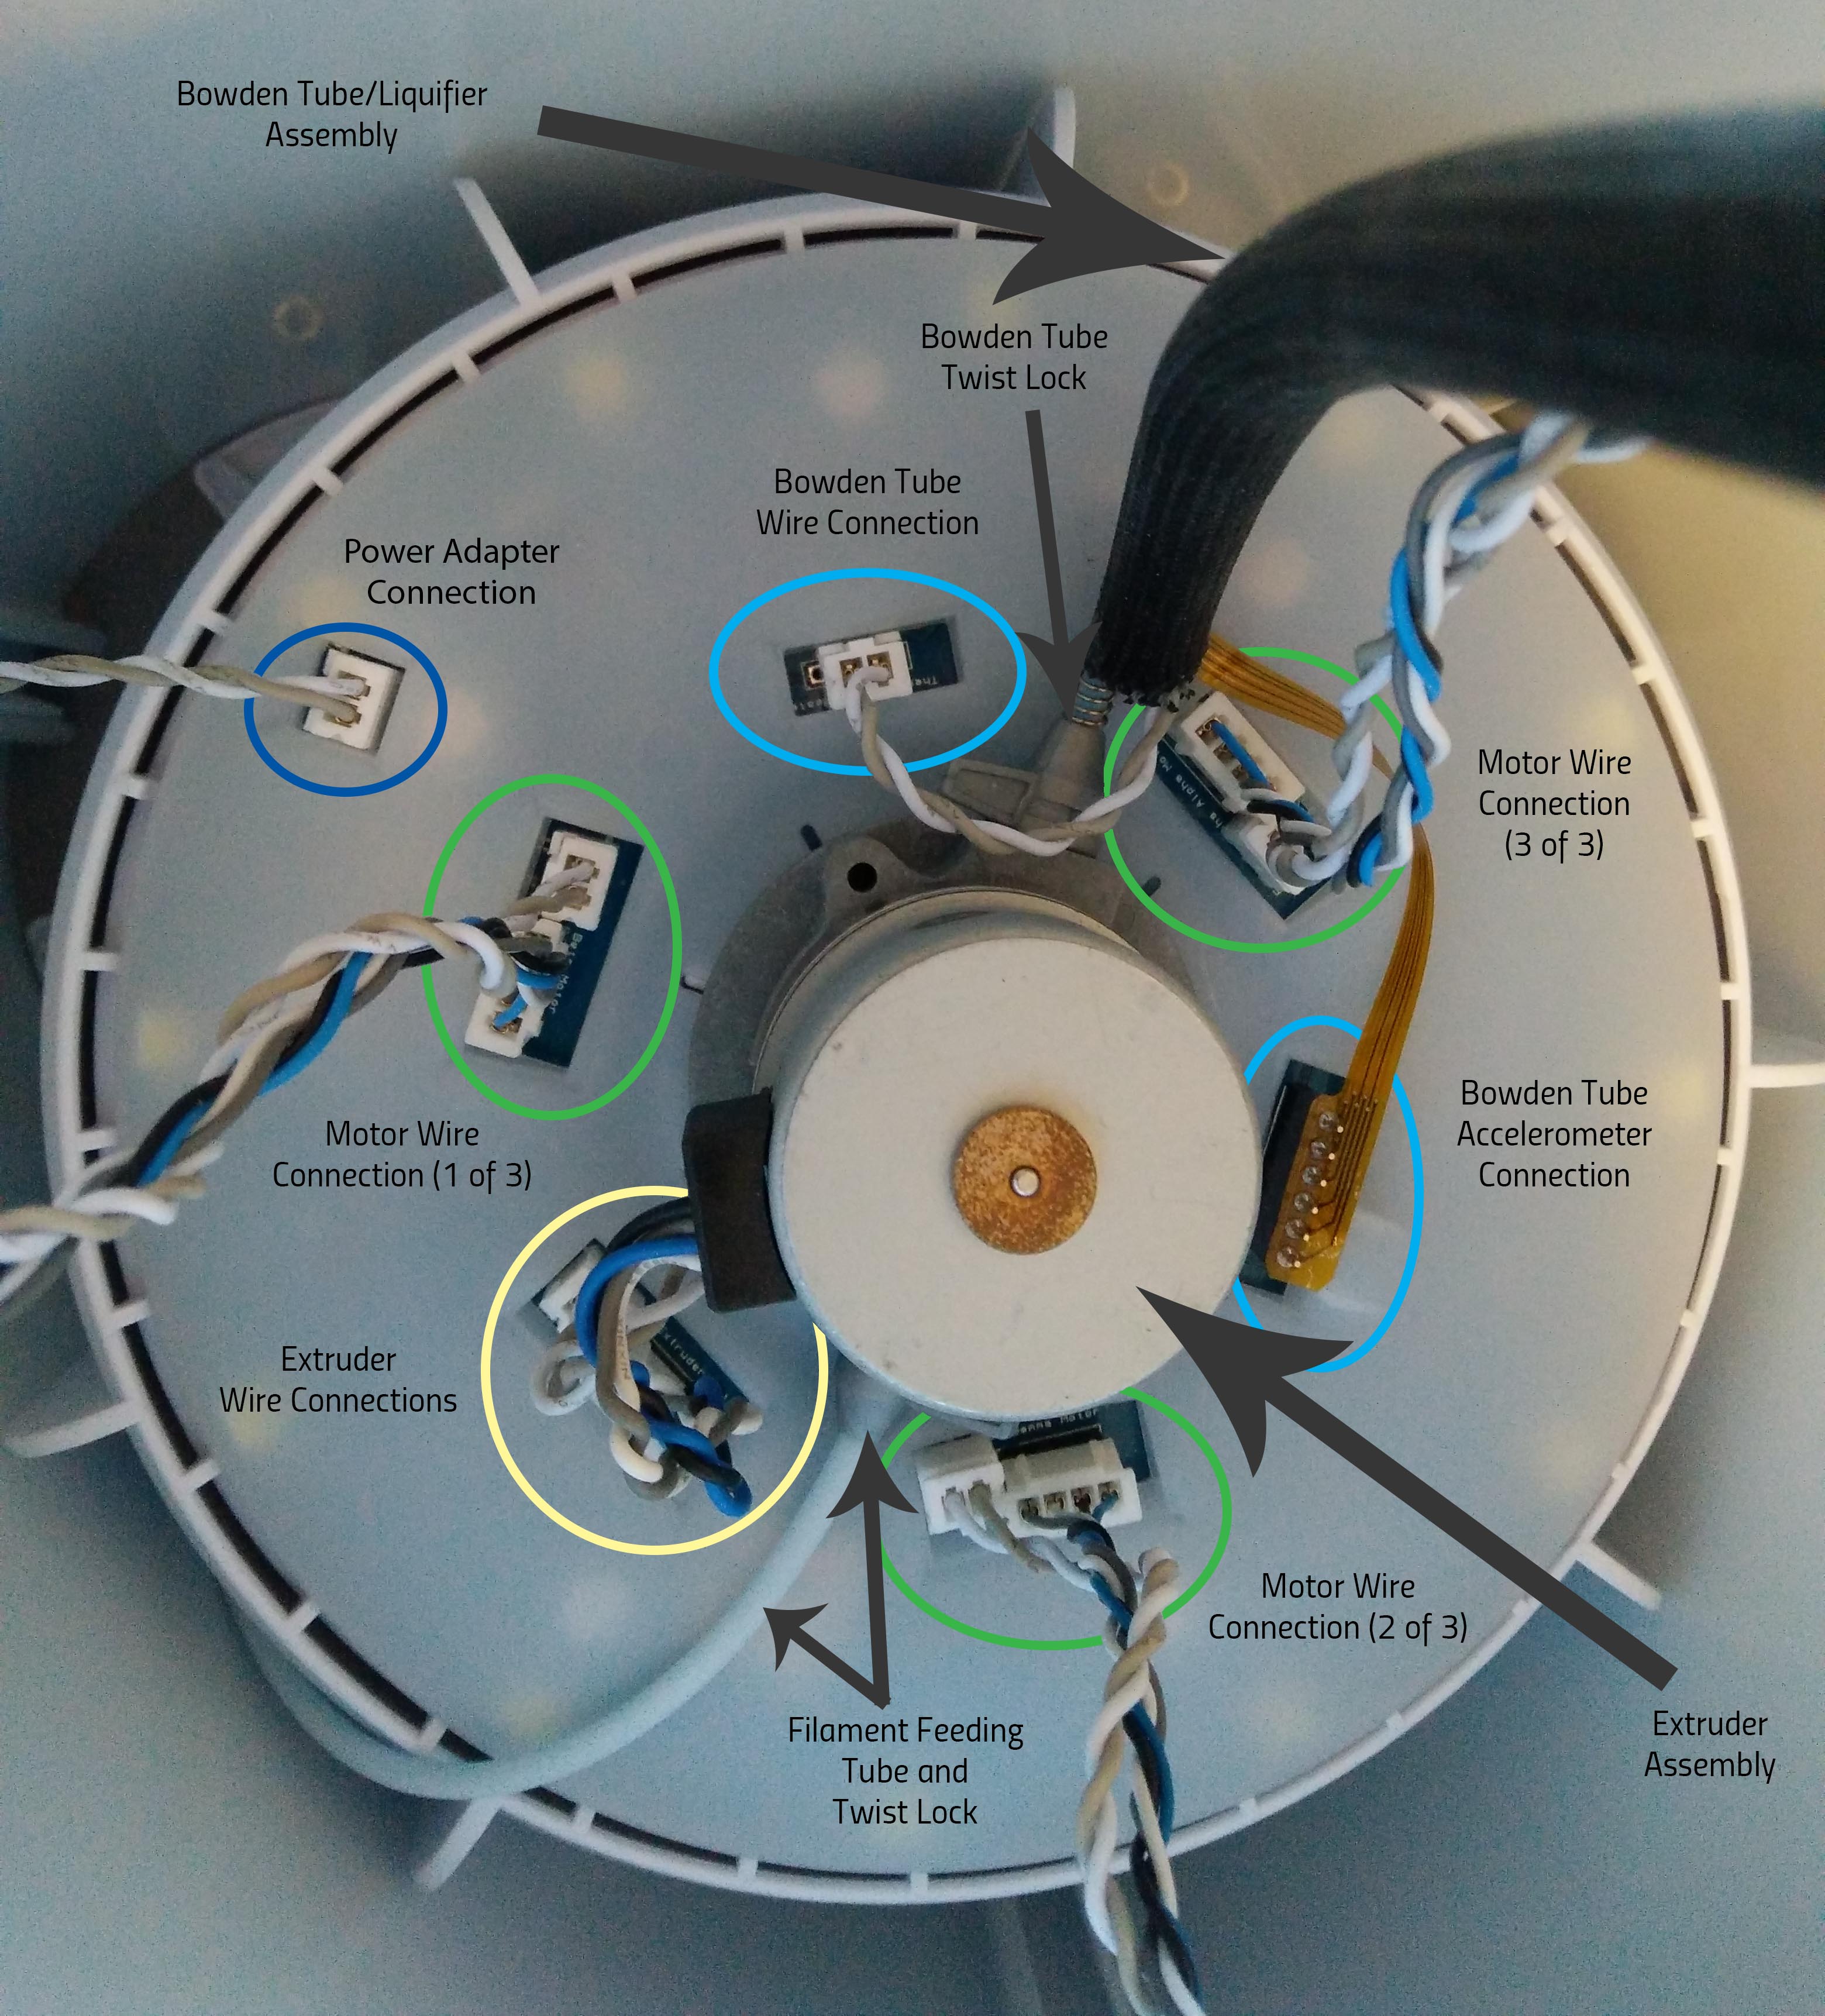
Extruder Assembly: This piece houses the motor that feeds filament into the liquifier. The motor pulls the filament in, allowing you to print.
Liquifier Assembly: Consisting of the Bowden Tube, heater and nozzle, filament is drawn into the tube by the extruder. It is then heated up by the heater, and comes out of the nozzle, dispensing filament during the print.
Motor Carriage - Motor is Hitting the Filament Tray
If one (or more) of your motors fails to stop at the top of the rail, and continues moving up until it hits the filament tray, your microswitch may be broken. To check this, please remove the faulty motor from the rail (flip your Tiko over, pull all motors to the bottom of the rails, pull the faulty motor off the rail) and check the top of the motor. You should see a small silver microswitch on the top of the motor. If you don't see one, or it looks damage, please visit our Replacement Parts page and order a new Motor Carriage.
Liquifier Assembly - Problems Loading/Unload
Typical symptoms of a liquifier issue may be: problems loading/unloading or filament not extruding.
- During the unloading process, your liquifier should heat up to allow you to remove the filament. If this does not happen, you may have an issue with your liquifier. To check, run the unload function. Once complete, flip your Tiko over and touch a piece of filament to the nozzle. If it melts or warms, your heater is functioning, and you liquifier is functioning.
- If your heater is working, but filament is not extruding and you have confirmed that your extruder is functioning, please proceed to the Filament Not Extruding to check for a potential jam.
Liquifier Assembly - Filament Not Extruding
This article is to help solve issue where filament is not extruding. Before following the below steps, please follow the advice in these articles to rule out other causes.
Once you have ruled out the above causes, the last thing to check for is a Liquifier Jam
If none of this helps, or you are positive there's no filament jam, head over to our Replacement Parts page and order a new liquifier!
Insert Your SD Card
If your Tiko is showing Error 101 and is not fixed by reformatting the SD card, please follow the guide below.
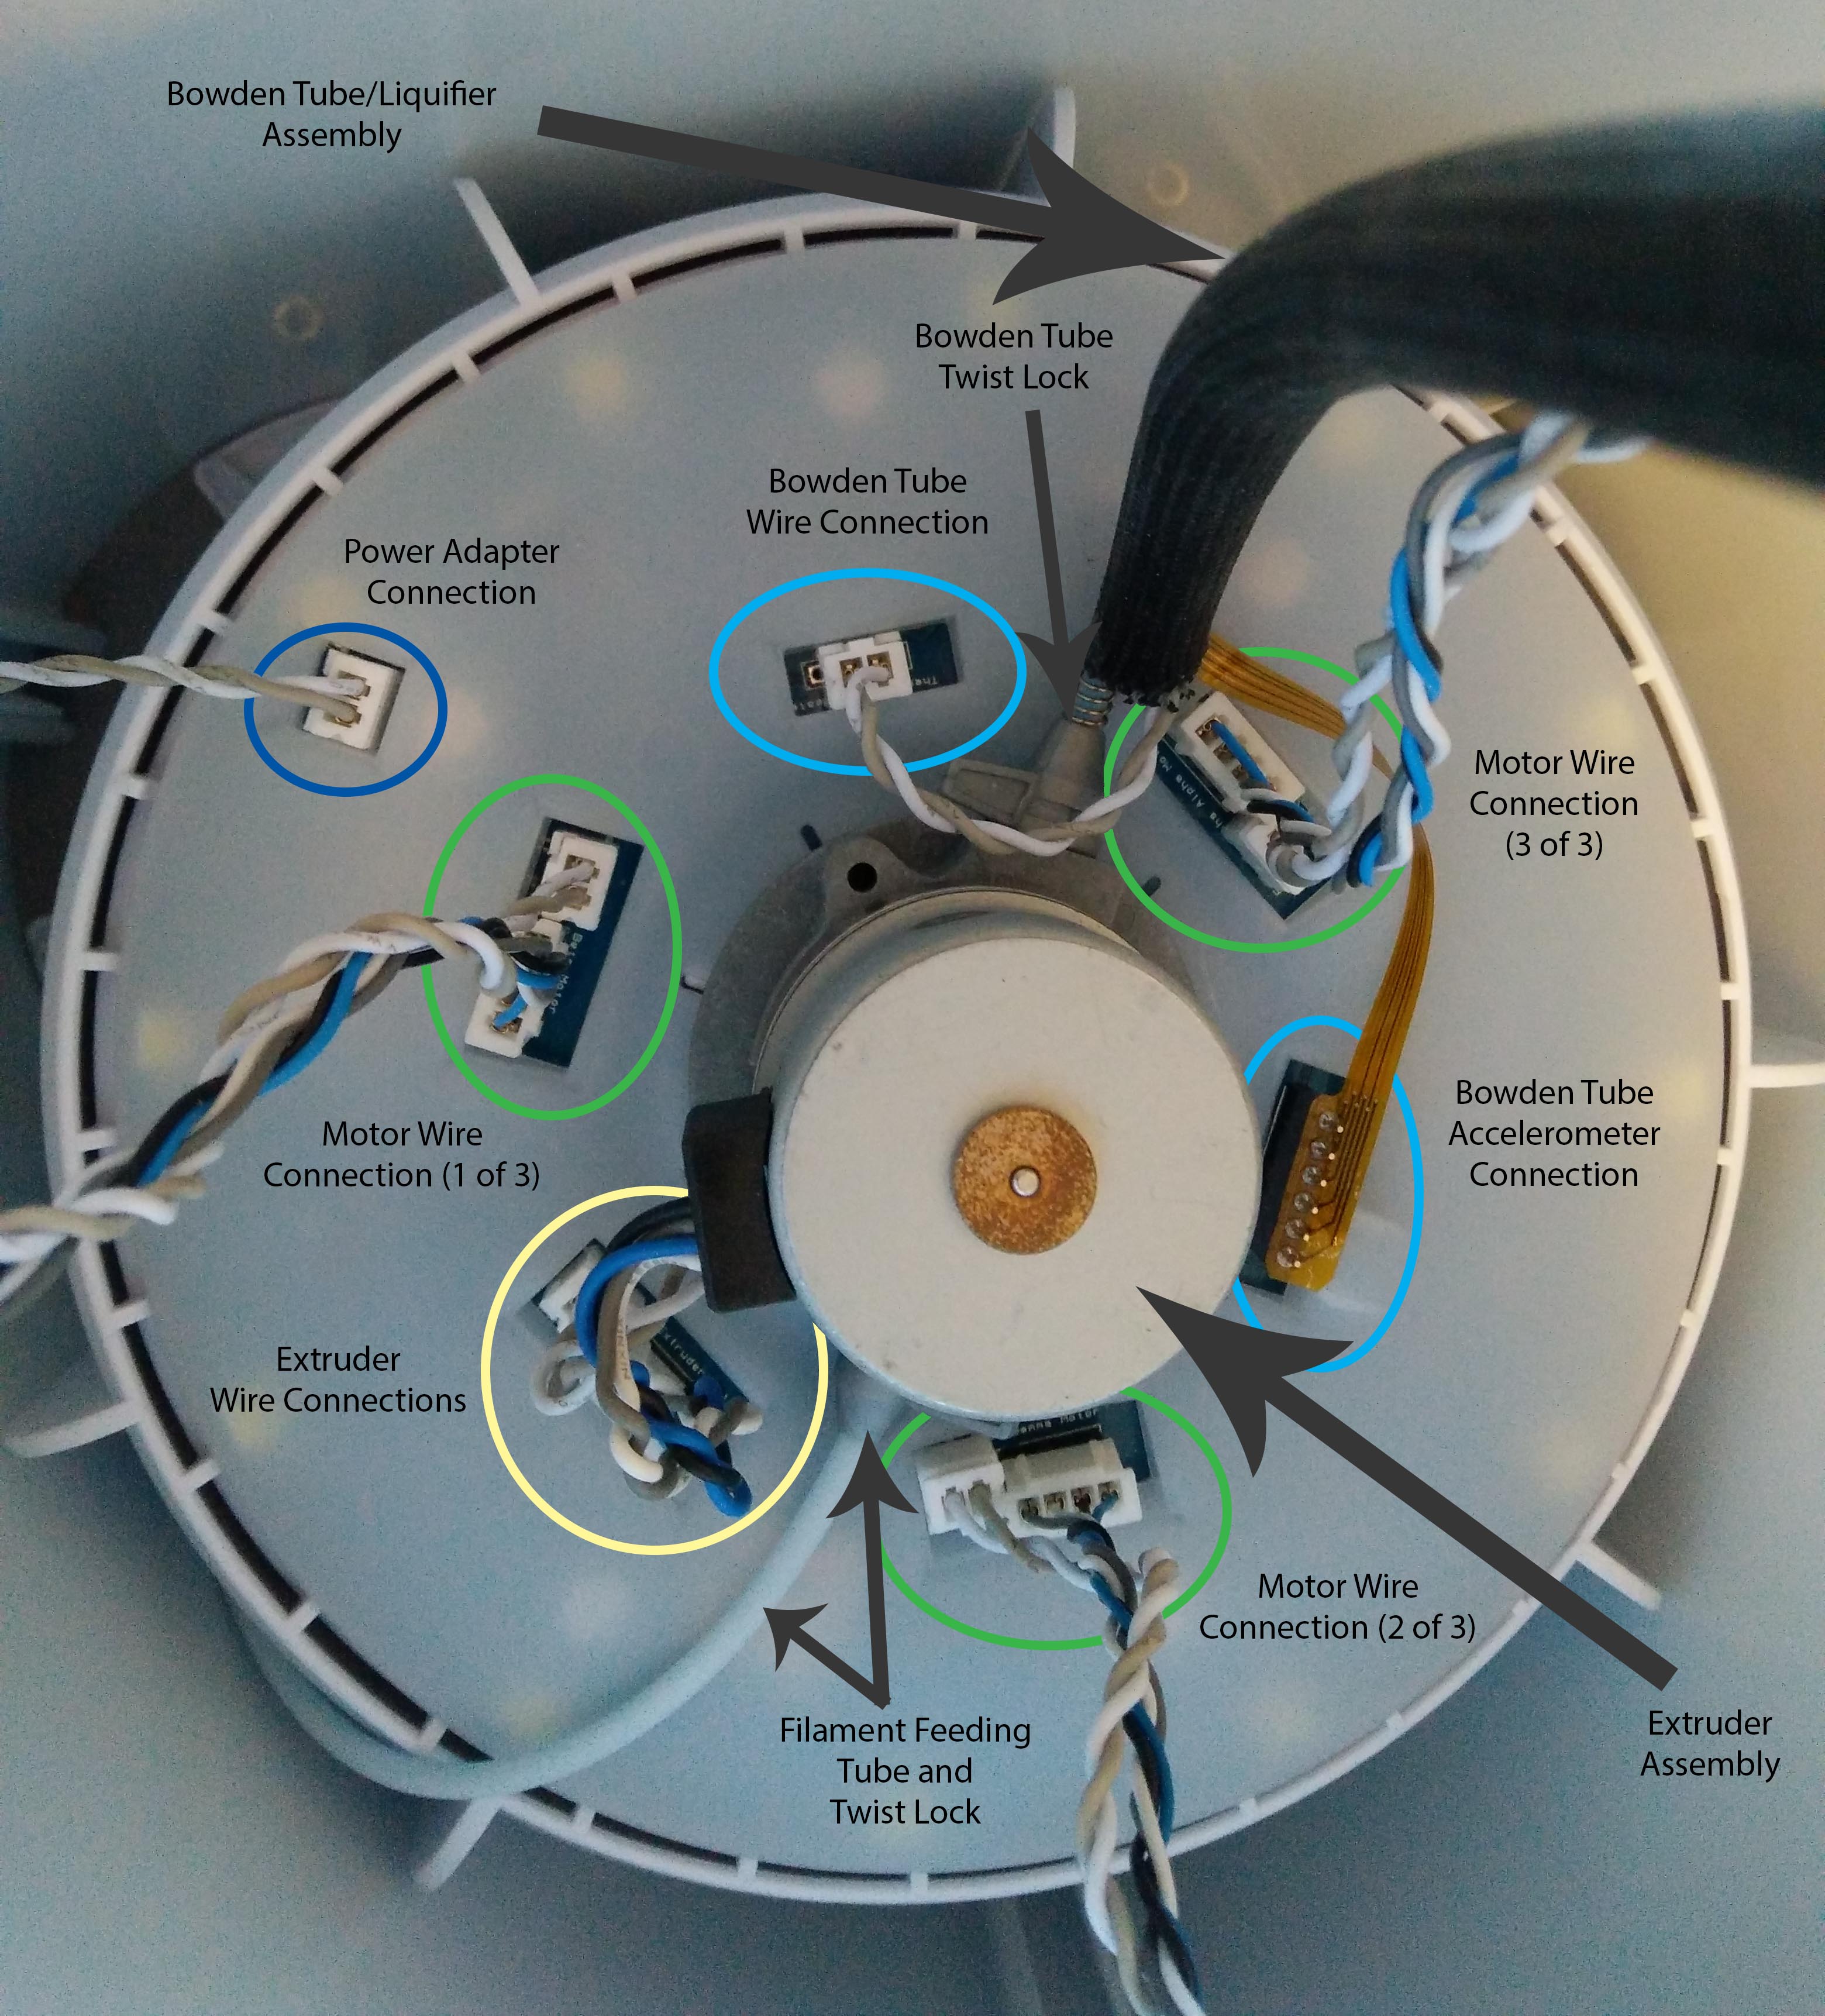
- Flip your Tiko over (make sure the power is disconnected)
- Unplug all wire connections
- Undo the two grey twist lock connectors - they should point straight up to release
- Push down on the extruder and turn counter-clockwise to remove the extruder
- Remove the plastic cover for the board
- On the board, there should be a silver piece where the SD card inserts. There is a spring-loaded mechanism, and you can just push it so that it is properly loaded
- Reassemble the printer by reversing the steps that you followed to take it apart. Please note that all 4-pin connectors have metal tips that should face outwards (facing the chassis, not the extruder)
- Once you've done this, plug your Tiko in and connect to the Wifi network. Then go to print.tiko/ or 192.168.1.1 and follow the setup instructions on-screen.
6. Errors
Error Codes
Download the Recovery Page here: https://www.dropbox.com/s/5m3ijufs46ru5r6/recovery.html?dl=0. Connect to your Tiko's hotspot and open the Recovery Page. Click 'Format SD Card' and click 'OK' with any pop-ups (there are a total of 3). Restart your Tiko once the process is complete.
If this process does not fix the error code, your SD card may have become dislodged. Please follow the guide for inserting your SD card
Onboard accelerometer failure 102
First, check that all delta motors are clipped onto the rails and can slide up and down easily. Ensure that nothing is blocking the path of the motors from travelling up and down the rails. Next, check that the wires runnning from the delta motors are firmly inserted into the board.
Error 102-104-105
Please disconnect the gold accelerometer ribbon and tape it out of the way. Restart your Tiko.
SOS Flashing, No Error Code
If you Tiko's LED lights are blinking in an SOS pattern, and there is no error code beside the wifi name of your Tiko, please unplug your Tiko and flip it over. Remove the gold accelerometer cable from the board and restart your Tiko. If the SOSing continues, please contact us by submitting a support ticket.
7. Print Quality Troubleshooting
The Head is Digging into the Bed
If the print head/nozzle is digging into the bed, your printer may not be leveled properly. Perform manually leveling so that the head is just barely touching the print bed. You should be able to just barely fit a piece of paper between the nozzle and the bed.
Print is not Sticking to the Bed
Try rinsing off the bed with a mild detergent, rinsing, and drying thoroughly. If this does not help, you can try spraying the bed with a light coating of hairspray. Please also use manual levelling, setting the print head down until it is just barely touching the print bed.
You can also try increasing the print temperature, as a higher temperature typically leads to better adhesion, however can result in a slight decrease in quality.
Why is Tiko Printing a Thin Outline Before a Print?
If you see a thin outline to the outside of your print when you first start a print, don't worry. This is called a skirt, and is designed to prime your printer. It gets out any old filament that was stuck in your nozzle, prepares Tiko for the print, and also gives you a chance to check your calibration/leveling.
8. General Questions
How does Tiko cool itself off?
Tiko doesn't require any vents or cool air circulation, because the high efficiency design doesn't generate much heat. Tiko cools itself passively, meaning you don't need to do anything other than start your print, sit back, and wait for it to finish!
How Can I Become a Distributor?
If you are interested in being a distributor with us please send an email to contact@tiko3d.com outlining some history about your company, other brands you have worked with and quantity size you deal with.
Where Should I Set Up My Tiko?
Tiko is very light weight, so you can basically print from anywhere, provided you have a power source to plug it into. Set up your Tiko on a flat surface near a plug and you're good to go!
Is Tiko Hard to Set Up?
Tiko is a pre-assembled printer. It is ready to print out of the box! All you have to do is unpack it and plug in the included power cable. No assembly required.
Print Dimensions and Printing Specs
The nozzle radius is 0.5 mm.
Maximum print size is 138.3 cubic inches. We don't have an X, Y, Z dimensions to provide because Tiko is not a Cartesian printer.
What Software do I Need to Use Tiko?
Tiko comes preloaded with our slicing software, the WIT, meaning you don't need to download anything to get started. Our WIT allows you to slice objects - basically it processes files for 3D printing, and creates code to tell the printer what to do.
With our software you aren't able to create objects, however there are online sources that have objects available for download. All you need to do is drag and drop an .STL file into our WIT to load the file.
Please note that the only types of files currently supported are .STL files.
Print Resolution and Specs
The Tiko can print layers as thin as 50 microns up to 250 microns (lower number is better resolution). In terms of printing small objects, the Tiko can print details as small as 1mm (though this is a bit on the small side and may be tough to do as the nozzle is 0.5mm in diameter). There is a tolerance (or accuracy) of about ± 0.2mm, meaning that it may print up to 0.2mm one way or the other in the xy direction of a print. details: tolerance of about +- 0.2mm in xy direction; can print features as small as 1mm.
Power Supply
Each Tiko will ship with a power supply made for your specific region of the world.
Is There an Emergency Shut Off?
If for some reason you need to cancel your print, all you need to do is:
- Tilt your Tiko. If your Tiko senses that it is not upright, the print will be cancelled.
- Unplug you Tiko.
What if My Printer Arrives Broken or Damaged?
We designed our packing materials to protect your Tiko during shipping, however there is a chance that your Tiko may become damaged during transport.
If there are internal components damaged, please visit Replacement Parts and order a new part, free of charge while under warranty.
If there is other damage that cannot be repaired with replacement parts, please contact us by filling out a Support Ticket
What are the System Requirements for Tiko?
Our software is browser-based, so the only requirements are based on your browser.
We recommend Chrome, however Firefox and Edge are also supported. Please make sure that your browser has been updated to the most recent version to ensure compatibility. We recommend you do not use Internet Explorer or Safari.
What is 3D Printing?
3D printing is the process of creating a object from a three-dimensional design. Basically, you can think of a 3D printer as a (more complex) hot glue gun. Filament is heated in a tube, and extruded out in thin layers until your object is complete. Each layer is a thin cross-section of your model, and fuses to the layer below it as it cools. Once all the layers are printed, you have your object.
What is Tiko 3D?
Tiko 3D is a consumer grade 3D printer, designed to make 3D printing accessible to everyone. Tiko is for anyone who is interested in 3D printing. Our goal was to create a printer that anyone can use!
Tiko's unibody design helps to overcome common alignment issues with other 3D printers, and the delta shape allows for high-precision and excellent mechanical repeat-ability. The enclosed build chamber protects your model from environmental factors, as well as keeps you safe from accidentally touching hot components.
9. Installation Guides
Inside Your Tiko
Please check out this picture to help identify the pieces of your Tiko, and to familiarize yourself with its parts!
.jpg)
Extruder Replacement
Follow the below guide to remove and replace your extruder assembly.
- Unplug your Tiko and turn it upside down (on its head).
- Gently pull up the arms so that you have more space to work (if a motor pops off, don’t worry, it pops right back on!)
- Unplug the two extruder wires, circled in blue.
- Undo the two (2) twist locks, one on each side of the extruder. They should point straight up to release. Pull the twist locks off the extruder
- Push down firmly on the center of the extruder, and turn counter clockwise (like a pill bottle) to remove.
- Take your new extruder, and line up large groove on bottom of the extruder with the two grooves on the plastic board cover. Push down and turn clockwise to install (like a pill bottle)
- Reattach the two twist locks
- Plug the connectors circled in blue back in. Please note: smooth side for each should be closer to the extruder. For the four-pin connector, the metal tips should face out toward the chassis.
- Push your motor arms back down, flip your Tiko right side up and start printing!
.jpg)
Liquifier Replacement
Follow the below instructions to remove and replace your liquifier
- Gently pull the heatsink (the black metal piece to which the motor arms attach) up to make space to work inside the chassis.

- Unplug the wires coming from the liquifier (heater and accelerometer). Undo the twist lock on the Bowden tube side - the grey tab will point straight up when it is unlocked.
.jpg)
- Using a twisting motion, pop the ends of the grey arms off the black heatsink.
- Remove your liquifier.
- Reattach the liquifier's twist lock. When locked in position, the grey tab will be facing the opposite direction of the twist lock on the other side of the extruder.
- Twist the liquifier in a gentle S shape before reattaching motor arms to the new liquifier's heatsink.
- Plug in the accelerometer and heater.
- Push the motor arms down and turn your Tiko right-side-up.
- Go to https://www.dropbox.com/s/5m3ijufs46ru5r6/recovery.html?dl=0 and download the Recovery.html file.
- Plug your Tiko in and connect to the Tiko Wifi network
- Open the Recovery Page and click 'Recalibrate Heater'. Click OK and allow the process to finish, then reboot your Tiko by unplugging and plugging back in.
Motor Carriage Replacement
Use the below guide to remove and replace your motor carriage(s)
The motor carriage is the otor that dries the arms, and allows the nozzle to move in whatever print pattern has been set for in the the gcode.
To replace a motor, simply pull the old one off the rails, and pop the new one on. Line up the silver gear in the middle of the rail, and gently press the middle of the motor to snap the two pairs of grey clips onto the outside of the rail.
If you need to remove the grey connecting arms, just twist and pull them off the nozzle and/or the motor. They just pop back on. The arms have some flexibility, so don't worry if you see them bending. Just try not to exert extreme force as they may snap.
Motor (Connecting) Arms
The motor arms, also known as the connecting arms, connect the nozzle to the motors and allow for movement. The grey connecting arms are flexible, and designed to pop on and off for easy replacement. If you are having trouble, you can give them a slight twist at the ball joint in order to remove them. To replace, simply push back on and they will pop into place.
10. Pre-Order FAQ
Will I be charged Tax/VAT/Customs fees?
You are responsible for any customs/VAT/taxes/duties etc. These are assessed upon entering your country, and you will receive a bill from the shipping company
I can't pay with Stripe and/or my payment is not working
If you are having issues with Stripe and payment. Check your email, you may have additional information about your transaction. Still having issues? Contact us.
What forms of payment do you accept?
We accept Visa, MasterCard, and American Express. We also accept gift and prepaid cards that are one of the above types. For more info, visit Stripe our payment processor.
How do I edit or modify my order?
Please contact us by filling out a support ticket.
Order Issues/No Confirmation Email Received
If you are experiencing issues with your order, or your order is going through there are a couple things to try.
1. Microsoft Edge and Firefox seem to be working better
2. Try un-checking the "shipping same as billing" and make sure that your billing address matches exactly what your bank has on file for you. Your shipping address can be anything.
If the above don't work, please Submit a Support Ticket
When am I going to receive my items?
Your Tiko will ship after we have fulfilled the orders of our Kickstarter campaign. We expect to start shipping Q2 2017.
What if I change my address?
If your order has not been shipped yet. Please contact us by filling out a support ticket.
What are the filament specifications?
Type: PLA, Filament diameter: 1.75mm, Spool diameter: 165mm (6.5 in)
What's included in one (1) order of a Tiko 3D printer?
A Tiko 3D printer, Starter PLA filament (100g), a country-specific power supply, a Quickstart Guide, and 3D printer slicing app.
Will Tiko ship with a country-specific power supply?
Yes, we will send you a power supply based on your shipping country.
Can I order filament with no printer?
Due to how we're shipping, we currently only accept filament orders with a minimum purchase of one Tiko.
I don't know my Kickstarter email and/or backer number
Check your email for a confirmation of your Kickstarter shipping payment.
If you no longer have your email confirmation:
- Log into your Kickstarter account
- Click your profile picture in the top right corner
- Select Tiko 3D from your list of backed projects
- Scroll down to the blue 'View Pledge' button on the right side of the screen
- Click 'View Pledge'
- Scroll down in the pop-up to the bottom where your backer number is listed.
- Your email can be found in your account settings.
How do I track my order?
We will send you tracking information once your Tiko ships to the email you used in Stripe pay.
Did my Order/Payment go Through?
If you receive an email from Stripe, your order was successful! Please check your junk/spam folder if you don't see it right away!
Exchange Rates for Refunds
Please note that we cannot control the exact amount that will be refunded to you, as it is dependent upon local exchange rates. We process the refund in USD, at which point it will be converted to your local currency and refunded to the card you used for your payment.